Team Member Admin Guide
Complete guide to managing service requests, proposals, portfolio, and customer communication
Quick Navigation
Getting Started
Accessing the Admin Panel
The admin panel is where you'll manage all service requests, create proposals, update the portfolio, and communicate with customers. To access it, your account must have team member permissions.
Step 1: Log In
Use the same passwordless authentication system as customers. Enter your email or phone number, receive a verification code, and log in. The system recognizes your team member role automatically.
Step 2: Navigate to Admin Panel
After logging in, click on "Admin" in the navigation menu or go directly to /admin. This is your admin dashboard where you can access all administrative functions.
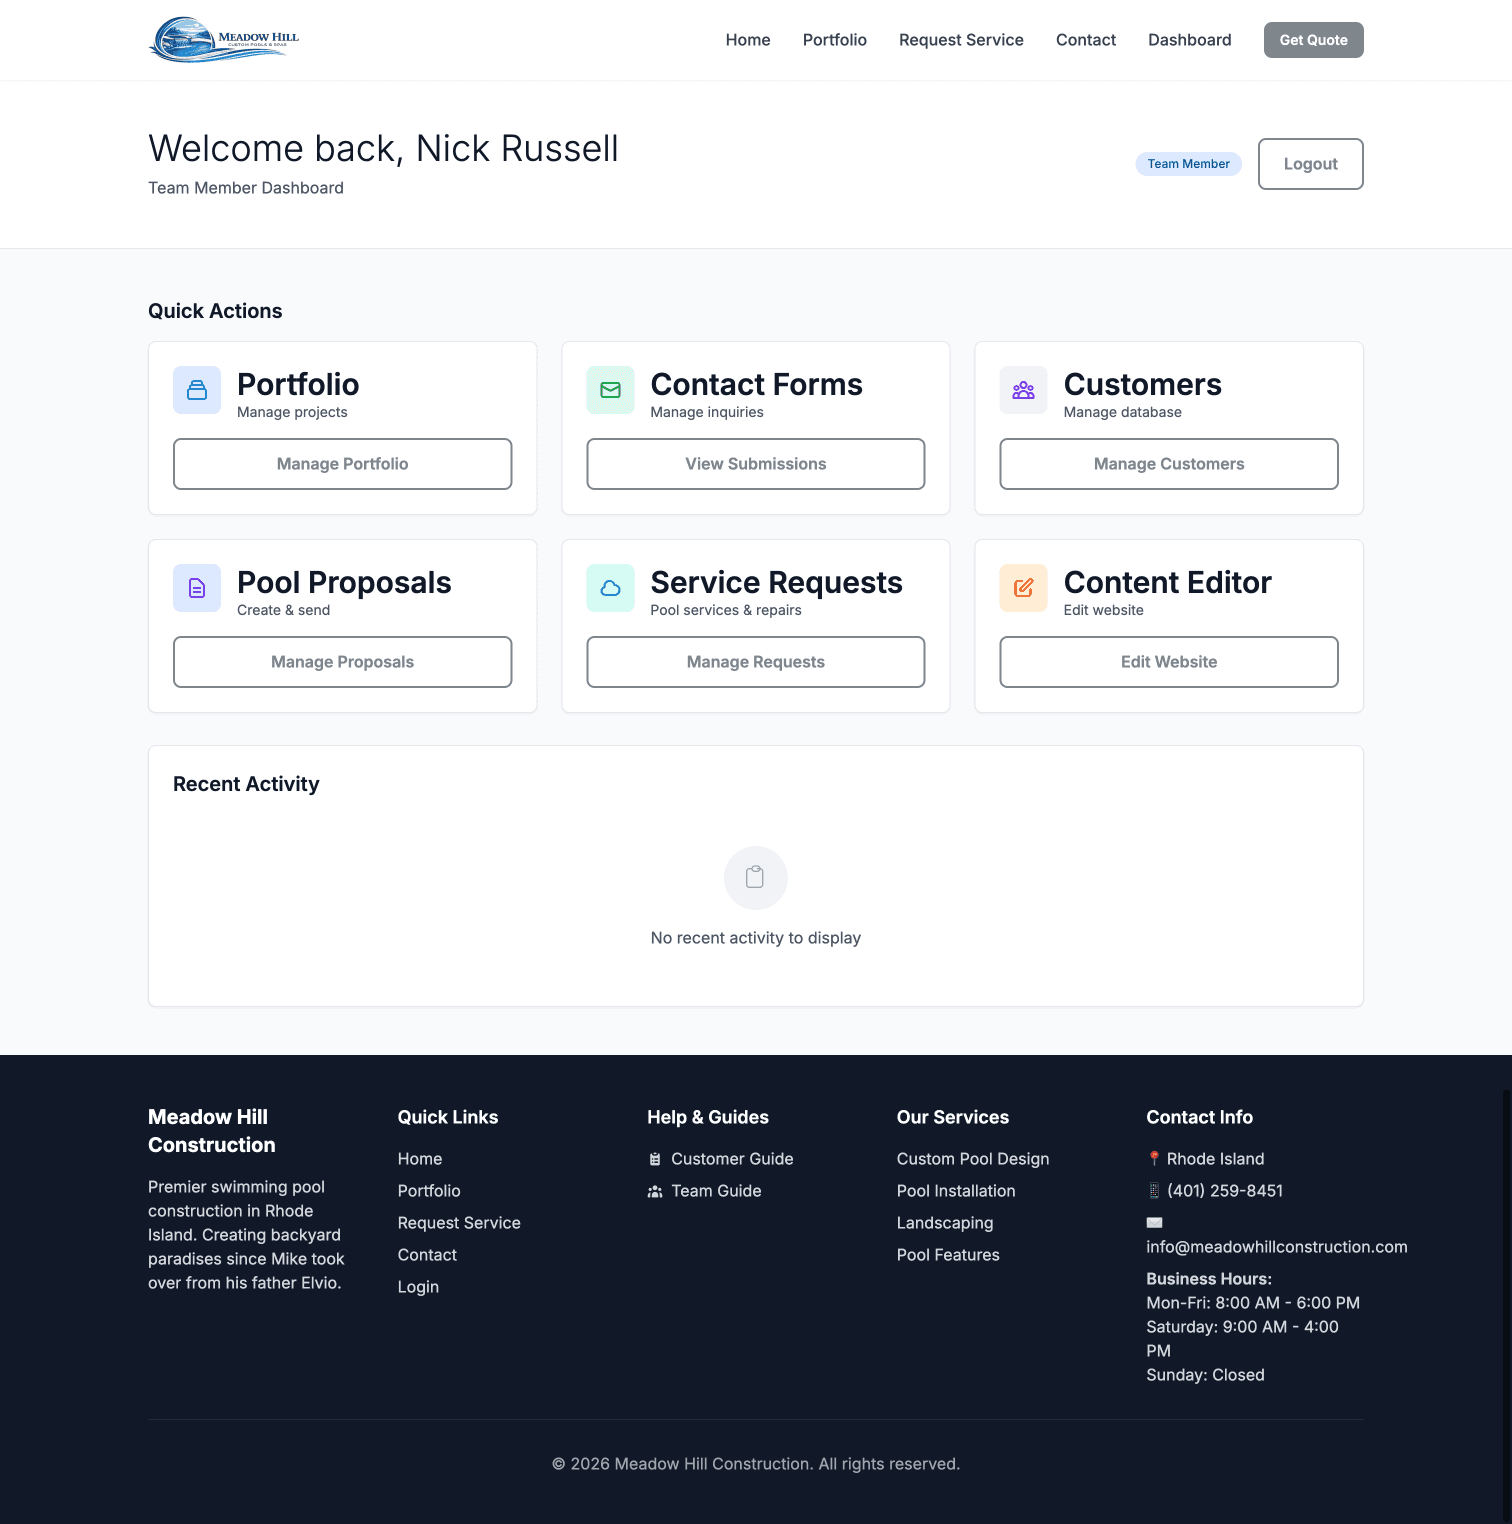
Admin Dashboard with quick action cards for all administrative functions
Admin Dashboard Overview
From the admin dashboard, you have quick access to:
- Service Requests: View and manage all customer service requests
- Pool Proposals: Create and manage pool construction proposals
- Customers: View customer profiles and contact information
- Portfolio: Manage portfolio projects and images
Important: Your admin account has access to sensitive customer information. Always maintain confidentiality and follow company security policies.
Service Requests & Messaging
Service Request Dashboard
The service request dashboard (at /admin/seasonal-services) is where you'll spend most of your time. It provides a comprehensive view of all service requests with powerful filtering and sorting capabilities.
Understanding the Statistics Cards
At the top of the dashboard, you'll see five color-coded statistics cards that provide an at-a-glance overview:
- Total (Gray): All service requests in the system
- Pending (Yellow): New requests awaiting review or scheduling
- Scheduled (Blue): Requests with confirmed appointment dates
- In Progress (Purple): Actively being worked on
- Completed (Green): Finished service requests
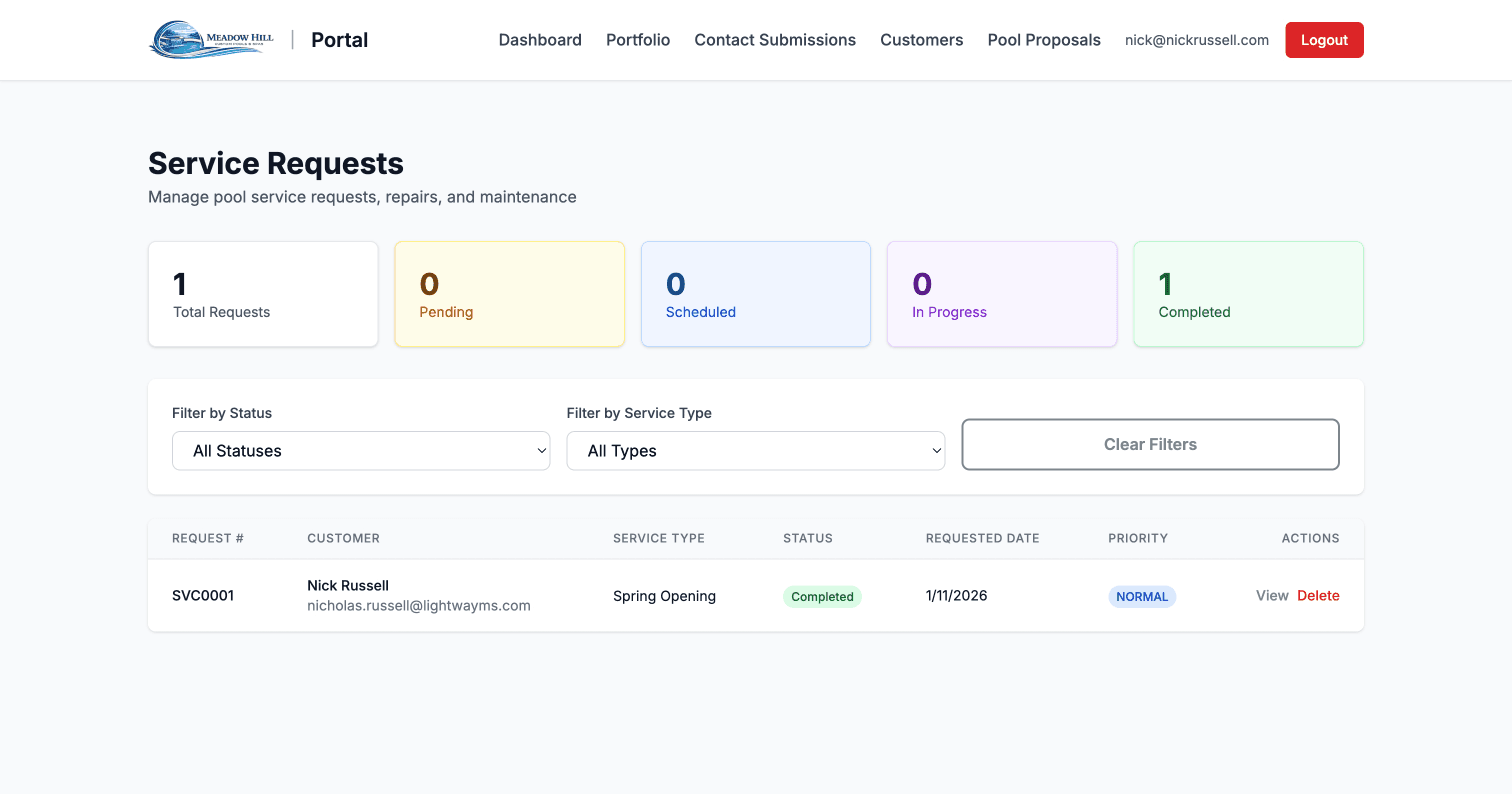
Statistics cards showing Total, Pending, Scheduled, In Progress, and Completed counts
Using Filters
Below the statistics cards, you'll find filter dropdowns that let you narrow down the requests you're viewing:
- Status Filter: Show only requests with a specific status (Pending, Scheduled, etc.)
- Service Type Filter: Filter by the type of service requested (Heater Repair, Spring Opening, etc.)
These filters work together, so you can view, for example, only pending heater repair requests. The table updates automatically when you change filters.

Full service request dashboard with statistics, filters, and requests table
The Requests Table
The main table displays all service requests (filtered by your selections). Each row shows:
- Request number (e.g., SR-2024-001)
- Customer name
- Service type
- Status badge (color-coded)
- Submitted date
- Scheduled date (if applicable)
- "View" button to open the full request details
Workflow Tip: Check pending requests daily. Respond quickly to show customers we're on top of their needs. Set status to "Scheduled" once you've confirmed an appointment.
Managing Individual Service Requests
Click the "View" button on any request to open the detail page. This is where you'll manage all aspects of that specific service request.
Request Detail Page Overview
The request detail page is organized into clear sections:
- Header: Request number and current status badge
- Customer Information Card: Name, email, phone number
- Service Address Card: Full address where service will be performed
- Pool Information: Pool type, size, equipment details
- Service Details: Special instructions, access notes, equipment notes
- Edit Form: Where you update status, priority, schedule, and pricing
- Communication Section: Threaded messaging with customer

Request detail page showing header, status, customer info, and service address
Editing Request Details
The edit form lets you update key information about the request. Here's what each field does:
- Status Dropdown: Change from Pending → Scheduled → In Progress → Completed (or Cancelled)
- Pending: Just received, needs review
- Scheduled: Appointment date/time confirmed
- In Progress: Technician is on-site or actively working
- Completed: Work finished, ready for billing
- Cancelled: Customer cancelled or request declined
- Priority Dropdown: Set urgency level
- Low: Can wait a week or more
- Normal: Standard priority, schedule within a few days
- High: Important, schedule ASAP
- Urgent: Emergency, same-day response needed
- Scheduled Date/Time: Date and time picker for the appointment
- Estimated Price: Your estimate before the job (shown to customer)
- Final Price: Actual cost after job completion (for invoicing)
- Technician Notes: Private notes for the technician doing the work
- Internal Notes: Private notes for office coordination
- Equipment Notes: Details about pool equipment relevant to service
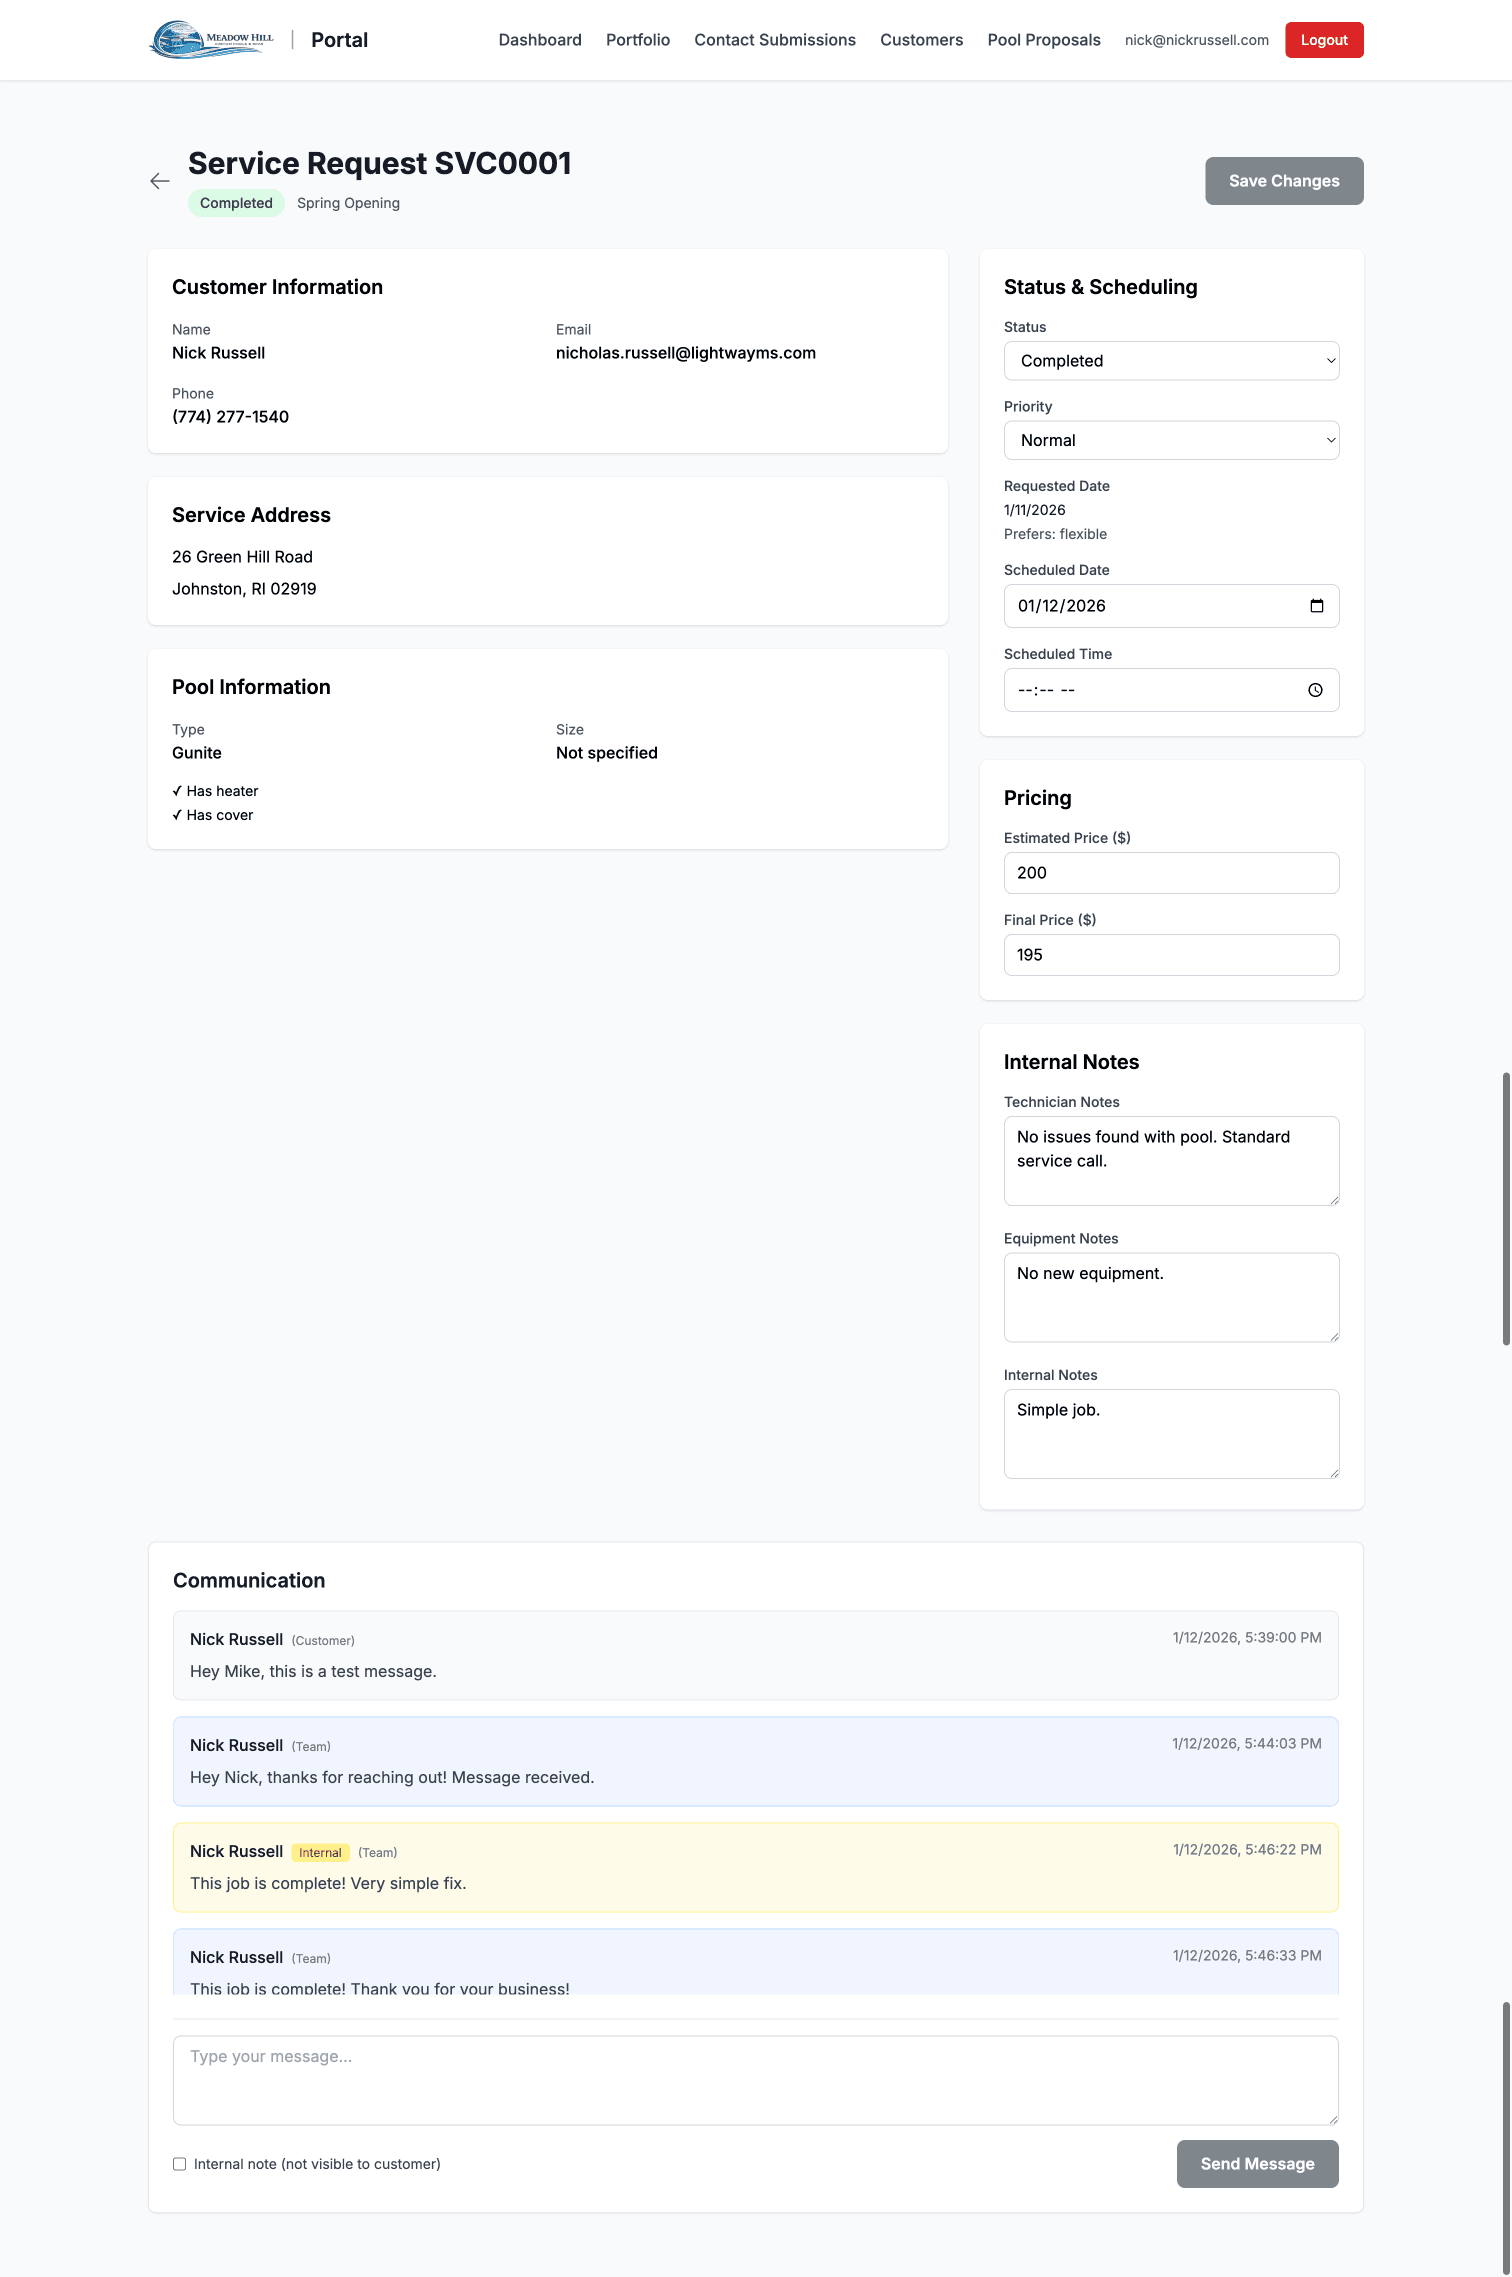
Edit form showing status, priority, scheduling, pricing, and notes fields
After making changes, scroll down and click the "Update Service Request" button to save. The customer will see updated status and scheduled date if applicable.
Best Practice: Always update the status when circumstances change. Customers appreciate transparency and will check their portal for updates.
Two-Way Messaging System
At the bottom of every service request detail page, you'll find the Communication section. This is a powerful messaging system that lets you have threaded conversations with customers and add internal notes for the team.
Understanding Message Types
There are three types of messages, each with distinct visual styling:
- Customer Messages (Gray Background): Messages sent by the customer. These appear in gray boxes and show the customer's name.
- Team Public Messages (Blue Background): Messages you send that the customer CAN see. These appear in blue boxes and are visible to the customer when they view their request.
- Internal Notes (Yellow Background): Messages you send that the customer CANNOT see. These appear in yellow boxes with an "Internal" badge. Use these for team coordination, scheduling notes, or sensitive information.

Messaging interface showing internal notes (yellow), team messages (blue), and customer messages (gray)
Sending Messages
To send a message to the customer or add an internal note:
- 1Type your message in the text area at the bottom of the Communication section
- 2Check the "Internal note (not visible to customer)" checkbox if this message should be private
- 3Click "Send Message"
- 4Your message appears in the thread immediately

Message input area with "Internal note" checkbox and Send Message button
When to Use Each Message Type
Public Messages (unchecked):
- Confirming appointments: "We've scheduled your service for May 15 at 10 AM"
- Asking for information: "Could you send photos of the heater?"
- Providing updates: "Our technician is on the way"
- Explaining findings: "We found the leak in the pump seal and replaced it"
Internal Notes (checked):
- Team coordination: "Joe will handle this, he's in that area Tuesday"
- Parts ordering: "Need to order heater part before scheduling"
- Pricing notes: "Customer mentioned budget is tight, quote conservatively"
- Access issues: "Customer mentioned aggressive dog, coordinate entry time"
CRITICAL: Always double-check the internal note checkbox before sending sensitive information. Once a public message is sent, the customer can see it immediately!
Pool Proposals
Creating Pool Proposals
The pool proposal system (at /admin/pool-proposals) lets you create professional, detailed proposals for new pool installations or major renovations. These proposals are created externally and can be shared with customers via a unique link.
Viewing the Proposals List
The proposals list page shows all proposals you've created in a table format. Each row displays:
- Proposal number
- Customer name
- Creation date
- Status (Draft, Sent, Accepted, etc.)
- Total amount
- Action buttons (View, Edit, Delete, Copy Link)

Proposals list showing table with customer names, dates, status, and actions
Creating a New Proposal
Click the "Create New Proposal" button to start a new proposal. You'll be taken to a comprehensive form with several sections:
1. Customer Information
Enter customer name, email, phone, and property address where the pool will be installed.
2. Pool Specifications
Detailed specs including pool type, dimensions, capacity, materials, finishes, and features like lighting, waterfalls, or automation.
3. Equipment
List all equipment included: pumps, filters, heaters, cleaners, automation systems, etc.
4. Pricing Line Items
Add individual line items for each component or service with descriptions and prices. The system automatically calculates subtotal, tax, and total.
5. Timeline & Warranty
Estimated project duration, key milestones, and warranty information.
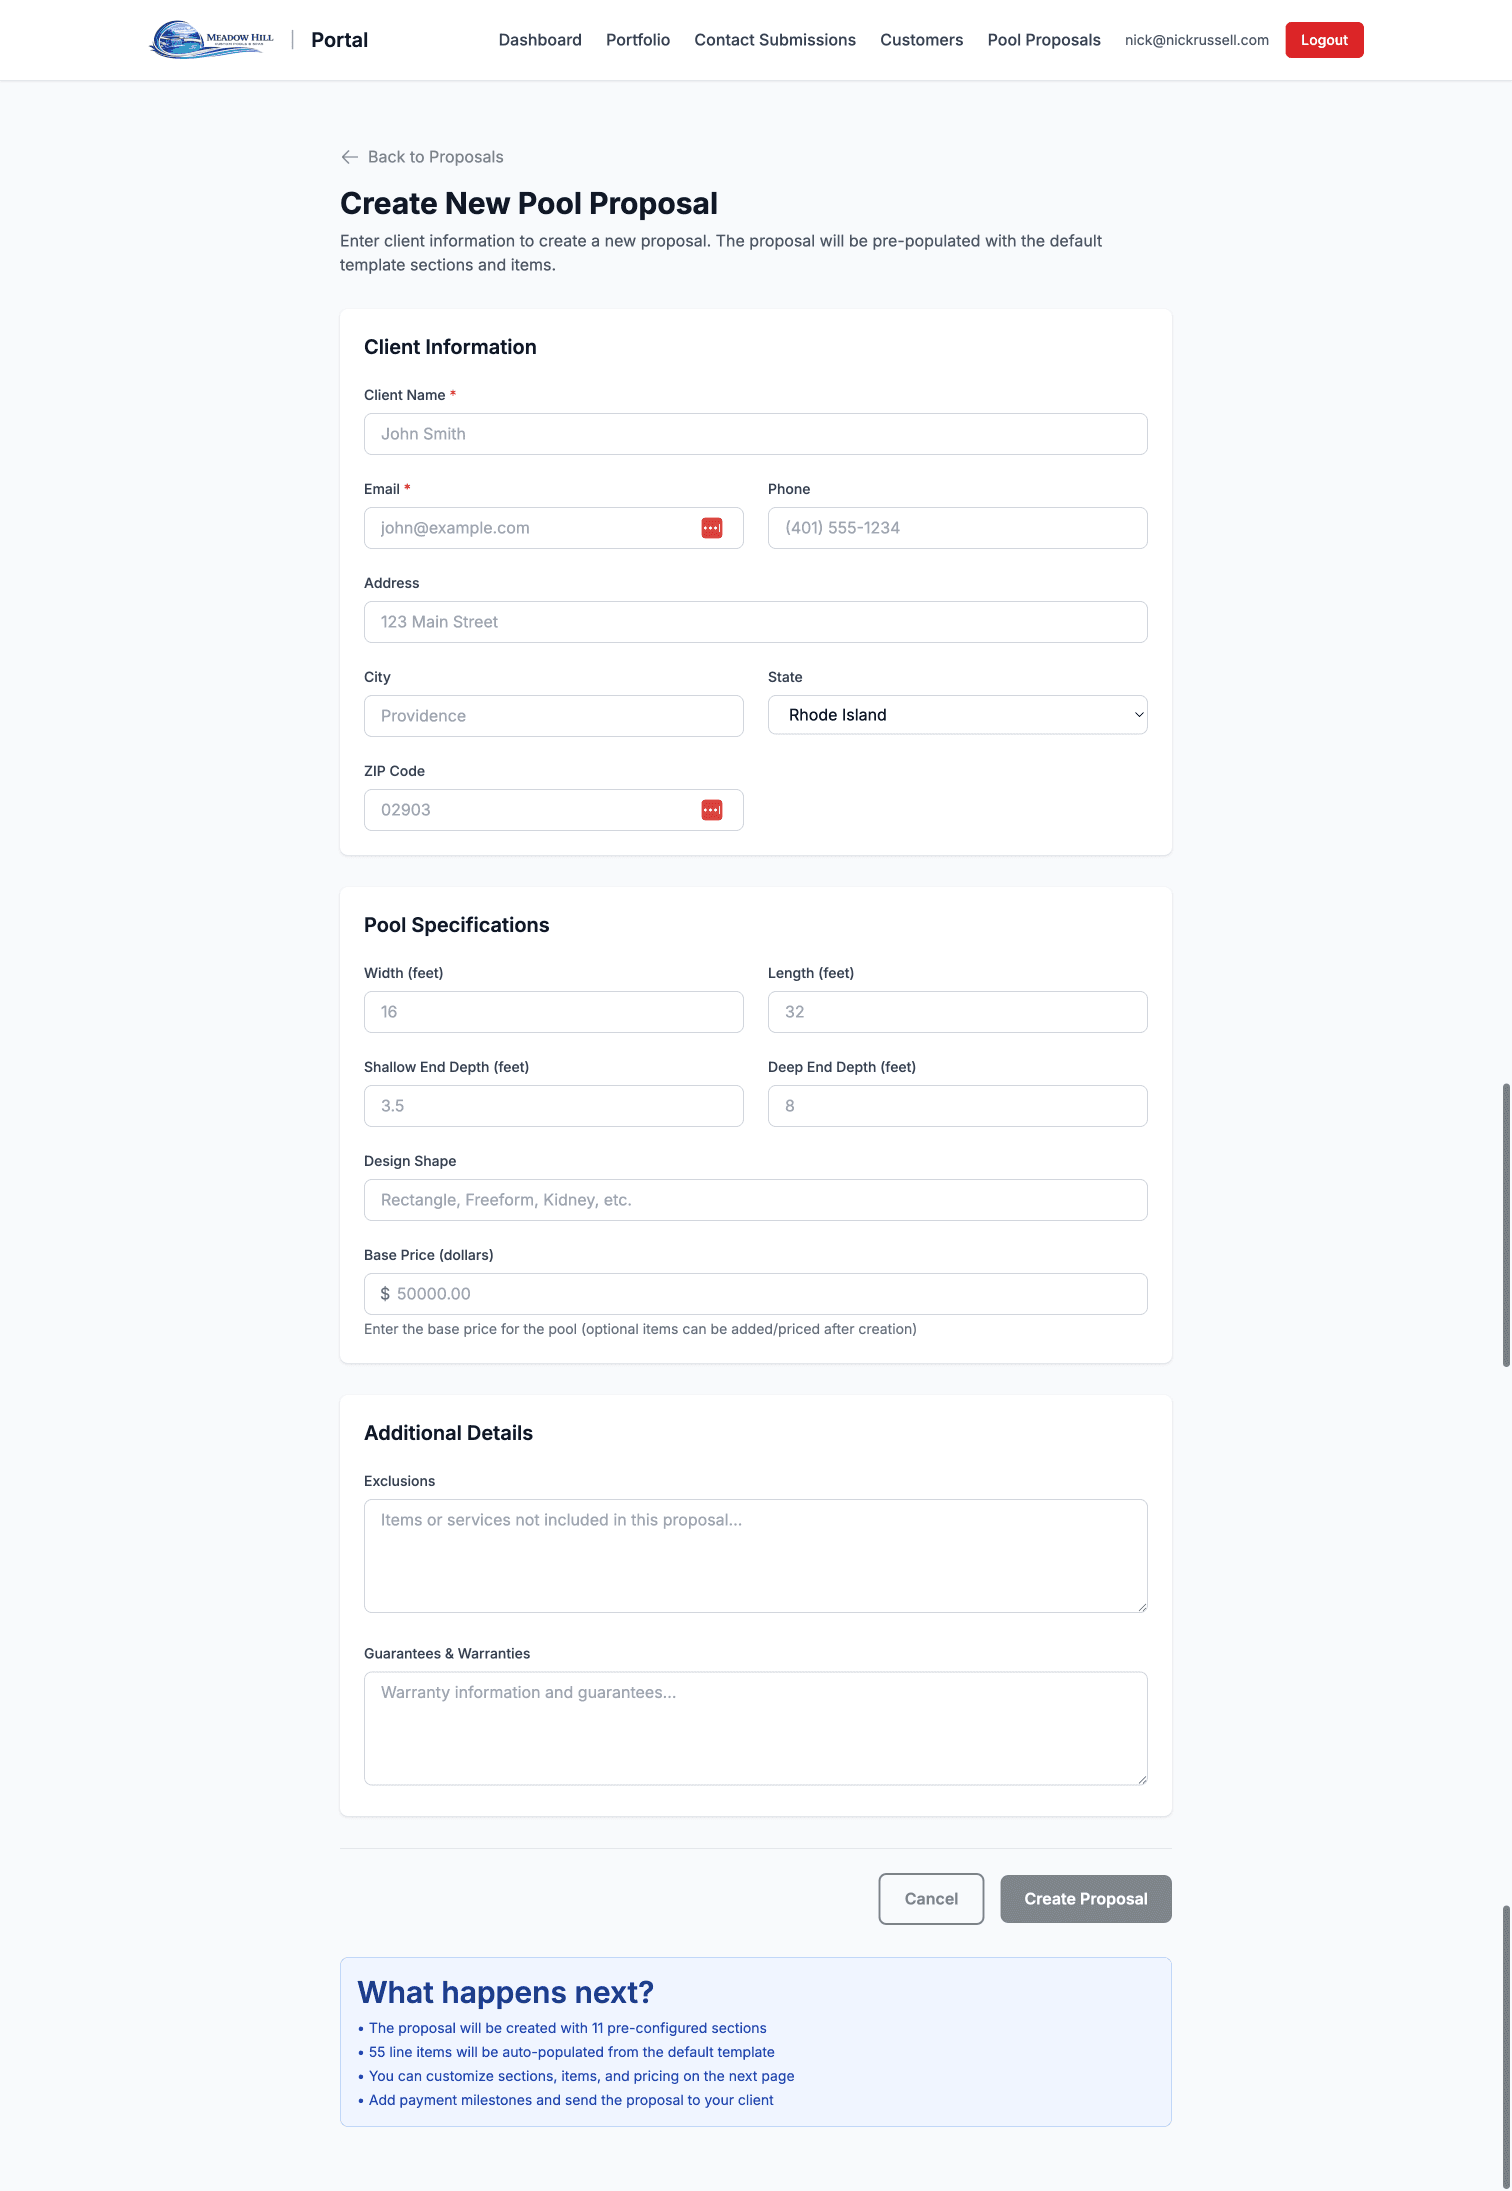
Proposal creation form with customer information, pool specs, and pricing sections
After Creating a Proposal
Once you save the proposal, the system generates a unique shareable link. You can:
- Copy the link and send it to the customer via email or text
- Edit the proposal if customer requests changes
- View the proposal as the customer would see it
- Track proposal status (sent, viewed, accepted)
Important: Proposals are not quotes created by a 3D model builder - they are comprehensive documents you create based on site visits, measurements, and customer requirements.
Portfolio Management
Managing the Portfolio
The portfolio management system (at /admin/portfolio) lets you showcase completed projects on the public website. This is an important marketing tool that demonstrates your work quality to potential customers.
Portfolio Management Interface
The portfolio page displays all your projects in either a grid or list view. Each project shows:
- Featured image (main photo)
- Project title
- Location (city/town)
- Project type (New Installation, Renovation, etc.)
- Short description
- Edit and Delete buttons

Portfolio management interface showing project cards with edit and delete options
Adding a New Portfolio Project
Click "Add New Project" to create a portfolio entry. You'll need to provide:
- 1Project Title: Descriptive name (e.g., "Custom In-Ground Pool with Waterfall - Newport")
- 2Location: City or town where project was completed
- 3Project Type: Category (New Pool Installation, Renovation, Repair, etc.)
- 4Description: Detailed text highlighting special features, challenges overcome, materials used, or customer satisfaction
- 5Photos: Upload high-quality images showing the finished work from multiple angles
- 6Featured Image: Select which photo should be the main thumbnail
- 7Publish Status: Save as draft or publish immediately to make visible on the public portfolio page
Best Practices for Portfolio Projects
- Photo Quality: Use high-resolution photos taken in good lighting. Show multiple angles including aerial views if available.
- Descriptions: Focus on unique features and challenges. "Custom saltwater pool with LED color-changing lights and automated chemical system" is better than "Nice pool."
- Diversity: Showcase different types of projects to appeal to various customer needs.
- Regular Updates: Add new projects regularly to show ongoing work and keep the portfolio fresh.
Marketing Tip: Always ask customers for permission before photographing their property. Many customers are proud to be featured and will share your portfolio page with friends!